Tuesday, March 1, 2011

Checking

                                                    Checking Stance Phase
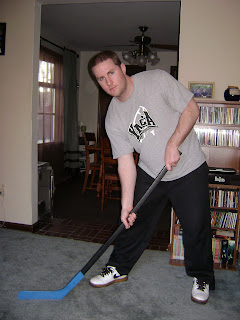
Stand with your skates shoulder width apart and have your lead shoulder (the shoulder you're about to hit your opponent with)  lower then your back shoulder.

Shoulder Joint- Sinister-Isometric Dexter-Isometric
Shoulder Girdle- Sinister-Isometric Dexter-Isometric

Elbow- Sinister-Flexion Dexter-Flexion
Radioulnar Joints- Sinister-None Dexter-Pronated

Wrist-Sinister-Isometric Dexter-Isometric
Hand-Sinister-Isometric Dexter-Isometric
                                                    Checking Prep Stance Phase
Stand with your skates about shoulder width apart. Begin to lower the front shoulder and have your back skate with the tip of the toe on the ice and the heel of the skate in the air.

Shoulder Joint- Sinister- Extension Dexter-Flexion
Shoulder Girdle- Sinister-Abduction Dexter-Adduction

Elbow- Sinister-Extension Dexter-Flexion
Radioulnar Joints- Sinister-Pronated Dexter-None

Wrist- Sinister-Adduction Dexter-Abduction
Hand- Sinister-Flexion Dexter-Flexion
                                                    Checking Movement Stance Phase
Balance with your front skate on the ground and your back skate in the air. Skates should be a little wider than shoulder width apart. As you brace for impact your front shoulder should still be lower then your back shoulder and your back skate should be in the air, while your front skate remains totally on the ice.

Shoulder Joint-Sinister-Extension Dexter-Flexion
Shoulder Girdle- Sinister-Abduction Dexter-Adduction

Elbow- Sinister-Flexion Dexter-Flexion
Radioulnar Joints- Sinister-None Dexter-None

Wrist- Sinister-Aduction Dexter-Abduction
Hand- Sinister-Flexion Dexter-Flexion

                                                    Checking Follow-Through Stance Phase
Your skates should be shoulder width apart. Both skates should be back on the ice and your front shoulder should still be slightly lower then your back shoulder.

Shoulder Joint- Sinister-Extension Dexter-Flexion
Shoulder Girdle-Sinister-Abduction Dexter-Adduction

Elbow- Sinister-Flexion Dexter-Extension
Radioulnar Joints- Sinister-None Dexter-None

Wrist- Sinister-Isometric  Dexter-Isometric
Hand- Sinister-Adduction  Dexter-Abduction

                                                    Checking Recovery Stance Phase
Skates shoulder width apart and both skates should be back on the ground. Shoulders should be at same level and you should be ready for a pass, shot, or to check another player.

Shoulder Joint- Sinister-Flexion Dexter-Extension
Shoulder Girdle-Sinister-Adduction Dexter-Abduction

Elbow- Sinister-Flexion Dexter-Extended
Radioulnar Joints- Sinister-None Dexter-None

Wrist- Sinister-Isometric Dexter-Isometric
Hand- Sinister-Isometric  Dexter-Isometric

Checking Video
Description: The person will begin by raising their stick in the air to about waist level. Once the hockey stick is at the waist level the person will then begin to lower their shoulder and brace for impact. The person will release their back skate off the ground and move their shoulder forward into the other person. While doing this their back skate will move closer to their front skate and the back skate will return to the ground. The person will then bring their stick back to the ground and get ready for a pass or a shot.

TERMS FOR "CHECKING"
Ice Skates- The shoes that are on a hockey players feet. The shoe is fitted with a metal blade in order to skate on the ice.

Hockey Stick- The stick that the hockey players use to shoot or pass the puck.

Shoulder Pad- The padding that is under the players jersey on top of his shoulder. This enables less impact when one player checks another player

DRILLS

       To improve your checking skills you can do a drill that is called the shoulder press. You would want to do this drill because when you go to check an opponent in hockey you use your shoulder and the shoulder press increases the muscle within the shoulders.
      In order to make sure you are doing this dril correctly make sure you are sitting with your back flat against the back of the chair and that both feet are flat on the ground. If you are doing the shoulder press standing up make sure your feet are flat on the ground and that your back is straight. You want to make sure you do not try to lift too much weight and that you fully extend your arms when lifting the weights or bar above your head.


See full size image

Passing

                                                    Passing Stance Phase
Skates should be shoulder width apart. Hockey stick should be on the ice. If you are a righty then your right hand should be half way up the hockey stick and your left should be at the top of the hockey stick.

Shoulder Joint- Sinister-Isometric Dexter- Isometric
Shoulder Girdle-Sinister-Isometric Dexter- Isometric

Elbow- Sinister-Flexion Dexter-Extension
Radioulnar Joints- Sinister-None Dexter-None

Wrist- Sinister-Isometric Dexter- Isometric
Hand- Sinister-Isometric Dexter- Isometric
                                                    Passing Prep Stance Phase
Skates should be pointing in the direction you are passing and should  not exceed shoulder width. Hands should be in the same position as the stance phase and your stick should still be on the ice, but it should be pulled back about 6 inches.

Shoulder Joint- Sinister-Extension Dexter- Extension
Shoulder Girdle- Sinister-Adduction Dexter- Abduction

Elbow- Sinister-Flexion Dexter-Entension
Radioulnar Joints- Sinister-Supinated Dexter-None

Wrist- Sinister-Isometric Dexter- Isometric
Hand- Sinister-Adducted Dexter- Flexed
                                                   Passing Movement Stance Phase
Skates should be shoulder width apart and facing the teammate you are passing to.Hands should be in same position as phase 1 and 2. Hockey stick should be slightly off the ground and 6 inches past your back skate.

Shoulder Joint- Sinister- Abduction Dexter- Adduction
Shoulder Girdle- Sinister-Extension Dexter- Extension

Elbow- Sinister-Flexion Dexter-Entension
Radioulnar Joints- Sinister-Supinated Dexter-None

Wrist- Sinister-Isometric Dexter- Isometric
Hand-Sinister-Adducted Dexter- Flexed
                                                    Passing Follow-Through Stance Phase
Skates should be a little less then shoulder width apart. Hokcey stick should be in front of your body and on the ground or slightly in the air. Hands should should still be in the same position as first 3 phases.

Shoulder Joint- Sinister- Abduction Dexter- Adduction
Shoulder Girdle-Sinister-Extension Dexter- Extension

Elbow- Sinister-Flexion Dexter-Entension
Radioulnar Joints- Sinister-Pronated Dexter-Supinated

Wrist- Sinister-Flexed Dexter- Isometric
Hand- Sinister-Adducted Dexter- Isometric
                                                   Passing Recovery Stance Phase
Skates should be shoulder width apart. Hockey stick should be on the ice. Hands should be in same position as other phases and you should be ready to make another pass.

Shoulder Joint- Sinister-Adduction Dexter- Abduction
Shoulder Girdle-Sinister-Flexion Dexter- Flexion

Elbow- Sinister-Flexion Dexter-Entension
Radioulnar Joints- Sinister-None Dexter-None

Wrist- Sinister-Isometric Dexter-Isometric
Hand- Sinister-Isometric Dexter-Isometric
Passing Video
Description: The person will begin with their stick on the ground like they are ready for the puck to be passed to them. They should then bring the stick back a little bit past their skate and off the ground about 6 inches. When doing this they should use their wrists to position where they want to pass the puck. They should then follow-through and push the puck to a team mate. Once the pass has been made the person should return the stick to the ground and get ready to either make another pass or get the puck back.

TERMS FOR "PASSING IN HOCKEY"

Ice Skates- The shoes that are on a hockey players feet. The shoe is fitted with a metal blade in order to skate on the ice.

Hockey Stick- The stick that the hockey players use to shoot or pass the puck.

Hockey Puck- The puck that is used during an ice hockey game.

Hockey Gloves- Gloves that are on the players hands during a game to protect their fingers and wrists.

Drills

One particular drill to do to improve your passing is called a wrist drill. This drills is aimed at making your wrists stronger and more flexible. We all know that when trying to pass a hockey puck you must have quick, flexible wrists. This drill is very simple and you do not even have to go to a gym to perform it.

What this drill involves is a weight 5-25 lbs, a string tied to the weight, and a piece of wood or some kind of handle. You can also improve you wrist strenght with the clamps they have in stores that you squeeze. When doing this drill you want to stand with your feet about shoulder width apart. You then want to turn one wrist in a clockwise fashion and your other wrist in a counter clockwise fashion. The object of this drill is so strenghten and quicken your wrists. Once you have rolled the weight up and there is nomore string left, let the weight back down, and try it again. This drill will cause your muscles to get tired, so if you feel yourself struggling after 3 or 4 times stop and take a break


Slap Shot

                                                    Slap Shot Stance Phase
Skates should be shoulder width apart and your hands should be place with one hand half way up the stick and the other hands at the top of the hockey stick.

Shoulder Joint- Sinister-Isometric Dexter-Isometric
Shoulder Girdle- Sinister-Isometric Dexter-Isometric

Elbow- Sinister-Flexion Dexter-Extension
Radioulnar Joints- Sinister-None Dexter-None

Wrist- Sinister-Isometric Dexter-Isometric
Hand- Sinister-Isometric Dexter-Isometric

                                                    Slap Shot Prep Stance Phase
Skates should be shoulder width apart. Hands should be in same place as phase one. Hockey Stick should be off the ice at about waist level.

Shoulder Joint- Sinister-Adduction Dexter-Abduction
Shoulder Girdle-Sinister-Flexion Dexter-Extension

Elbow- Sinister-Flexion Dexter-Extension
Radioulnar Joints- Sinister-None Dexter-Pronated

Wrist- Sinister-Extended Dexter-Flexed
Hand- Sinister-Adducted Dexter-Abducted

                                                  Slap Shot Movement Stance Phase
Skates should be shoulder width apart. Hands are positioned in same position as phase 1 and 2. Hockey stick should be parellel to the ice and the tip of the hockey stick should be positioned at about head level.

Shoulder Joint- Sinister-Adduction Dexter-Abduction
Shoulder Girdle- Sinister-Flexion Dexter-Extension

Elbow- Sinister-Flexion Dexter-Extension
Radioulnar Joints- Sinister-None Dexter-Pronated

Wrist- Sinister-Isometric Dexter-Isometric
Hand- Sinister-Isometric Dexter-Isometric
                                                   Slap Shot Follow-Through Stance Phase
Skates should be shoulder width apart. Hockey stick should be in front of your body at waist level. The wrist that is half way up the hockey stick should be facing torward the ceiling, while the wrist that is at the top of the hockey stick should be facing the ground.

Shoulder Joint-Sinister-Abduction Dexter-Adduction
Shoulder Girdle- Sinister-Extension Dexter-Extension

Elbow- Sinister-Flexion Dexter-Extension
Radioulnar Joints- Sinister-Supinated Dexter-Pronated

Wrist-Sinister-Flexed Dexter-Isometric
Hand- Sinister-Adducted Dexter-Abducted
                                                    Slap Shot Recovery Stance Phase
Skates shoulder width apart. Hands are positioned back in stance 1. Hockey stick should be back on the ground ready to take another slap shot or receieve a pass.

Shoulder Joint-Sinister-Adduction Dexter-Adduction
Shoulder Girdle-Sinister-Flexion Dexter-Extension

Elbow- Sinister-Flexion Dexter-Extension
Radioulnar Joints- Sinister-None Dexter-None

Wrist- Sinister-Isometric Dexter-Isometric
Hand- Sinister-Isometric Dexter-Isometric
Slap Shot Video
Description: The person should begin with their stick on the ground as if they are ready to make or receive a pass. Once the person has the puck they should begin to move their stick backwards until it is about 6 inches behind their head. Then the person should bring the stick down (at full speed) and try to hit the puck as hard as they can. While doing this they should follow-through and the stick should end up at about waist level in front of them. To recover from this the person should bring their stick back to the ground and be ready for another pass, shot, or to make a pass.

TERMS FOR "SLAP SHOT"

Ice Skates- The shoes that are on a hockey players feet. The shoe is fitted with a metal blade in order to skate on the ice.

Hockey Stick- The stick that the hockey players use to shoot or pass the puck.

Hockey Puck- The puck that is used during an ice hockey game.

Hockey Gloves- Gloves that are on the players hands during a game to protect their fingers and wrists.

Hockey Goal- The net/goal where the hockey players try to score in during a hockey game.

Drills

There are plenty of drills you can do to improve your slap shot. A slap shot involves your legs, arms, shoulder, and core. I want to focus on one particualr drill that is called the weighted squat. This drills works on your legs. Legs are important during a slap shot because this is the first place where you get your power from. You have to push off with your back leg/skate to get power and then you transfer your weight foward.

During this drill you want to make sure you do not lift too much weight because you can easily throw your back out. You also want to make sure your back is straight, your keeping your thighs parrellel to the floor while squatting, and that your feet are about shoulder width apart. This will give you a good balance and you will not injure your back.